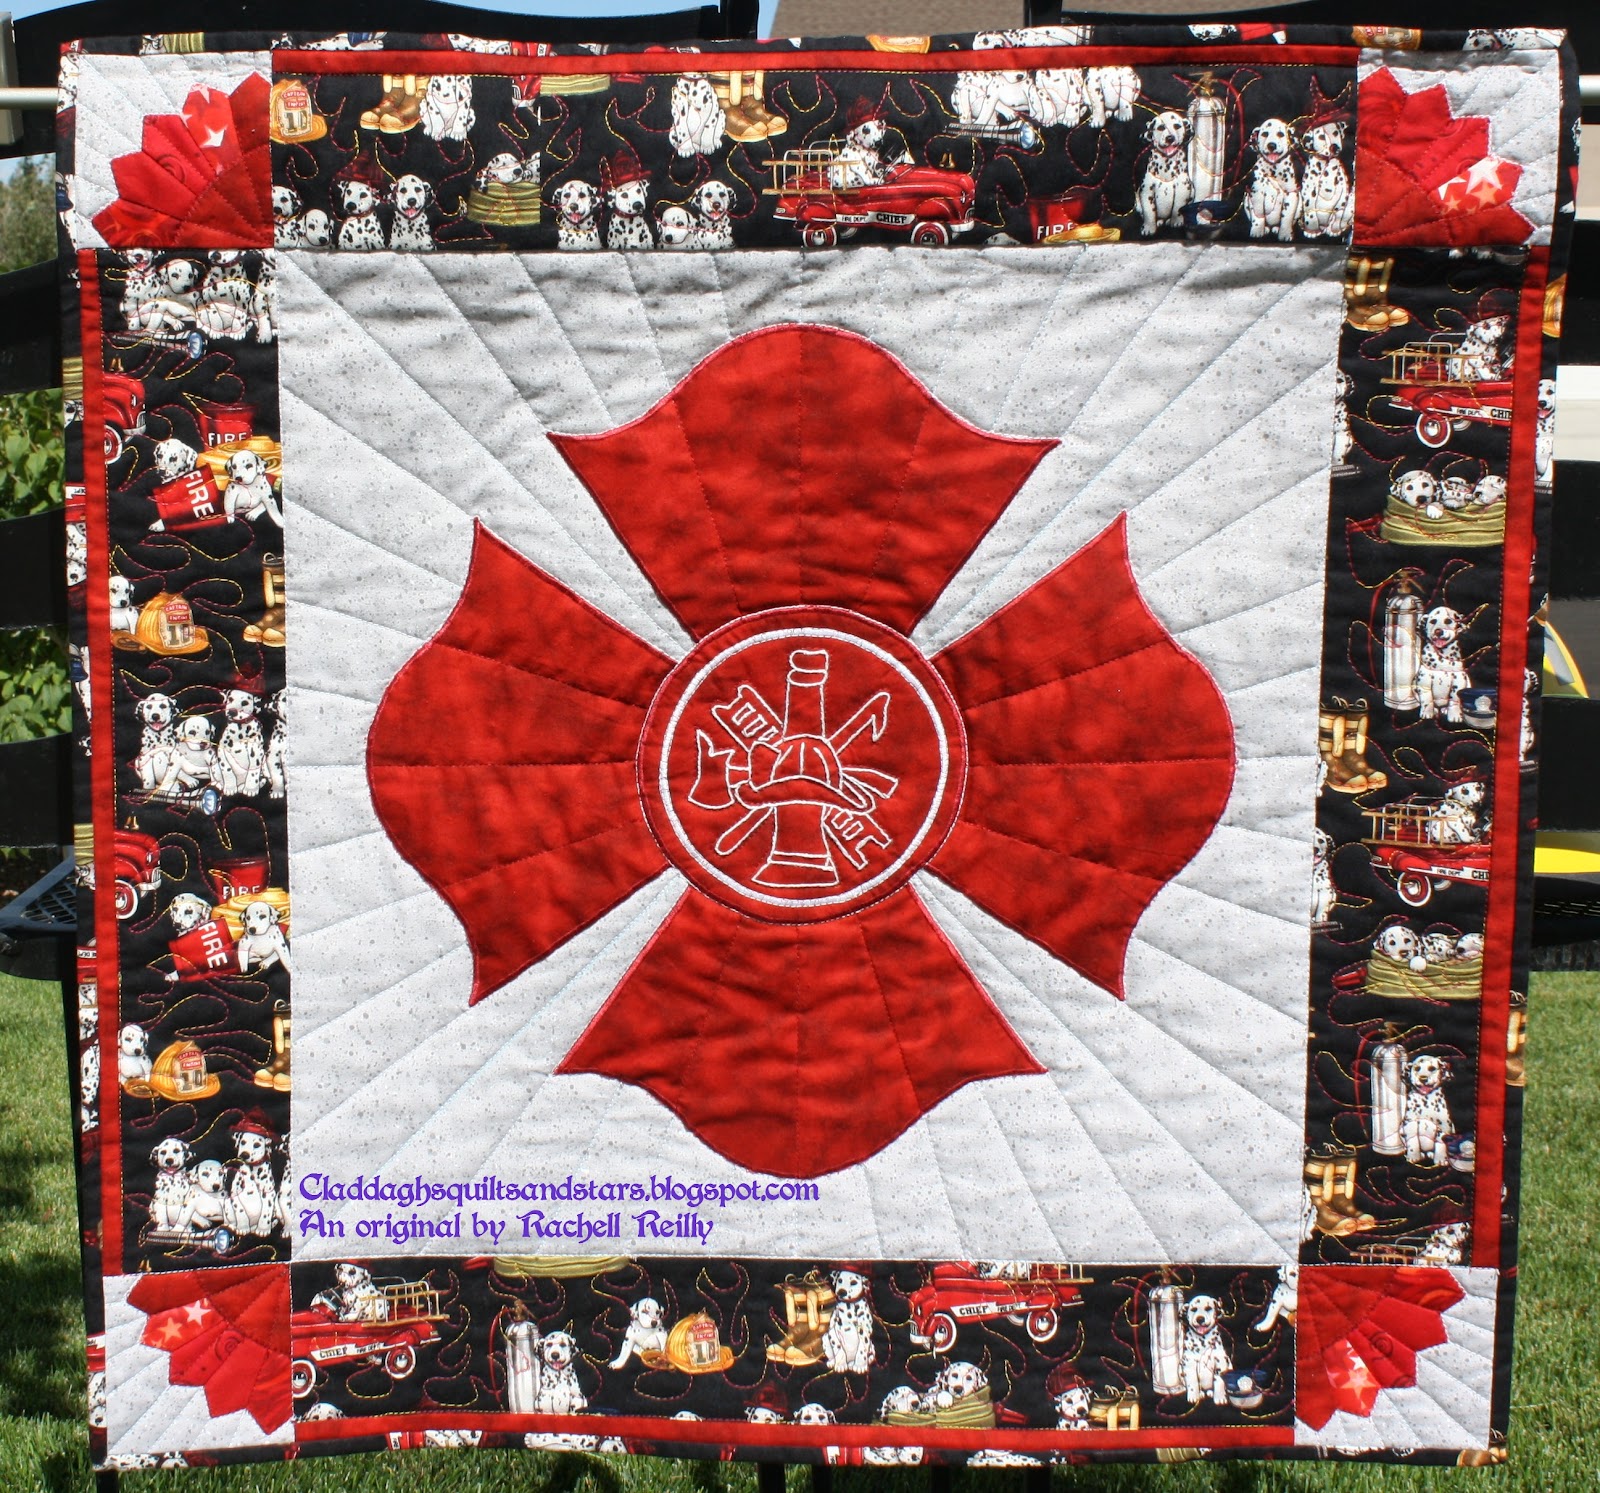
Several bloggers have stopped by my blog and requested instructions on how to make my Maltese Cross Dresden for firefighter family or friends. Here we go!
* Please note: this is an original design and pattern by me, Rachell Reilly. Copyright 2012. Please give credit and please DO NOT sell my design or tutorial. All work and photos are mine and belong to me.
Circle tutorial by Karen's Quilting is linked by permission.
Maltese Cross graphic was found on the web from a friend's memorial badge graphic. You should probably do a web search for one.
Maltese Cross Dresden
Supplies:
-Cut One 6.5"x WOF (Width of Fabric) strip red solid or red tone-on-tone blender
-Trace One 8" diameter Circle from same red fabric, cut out 1/4" larger than marked circle
-cardboard or heat-resistant Mylar circle 7 1/2" diameter
-Cut one 19" square background fabric
-Double-sided paper-backed fusible web, like Pellon Wonder Under or Steam-A-Seam 2
-EZ Dresden ruler by Darlene Zimmerman
-Leaves Galore--size: Grande-- Appliqué Template Ruler by Sue
-Spray starch
Assemble the arms of the Cross (Dresden part)
1--use EZ Dresden ruler to cut wedges from the 6.5" strip. Line up the bottom edge of ruler with one edge of strip, and the 6.5" marking on the ruler with the opposite side of the strip. Make your first cut to make the first angle, and then cut your first wedge.
Then rotate the ruler upside down, line up the cut edge angle on the fabric to the ruler and the same top and bottom measurements, and cut the next wedge.
*It might help to walk around to cut from the other side, or rotate your cutting mat (I did that, below).
-Cut 16 wedges.
2--Sew four wedges together to make 1 wedge set, pressing seams open.
Make 4 wedge sets (the quarters of the Dresden and arms of the cross).
-Then press under 1/4" on the long outside side edges of the wedge sets (see fingers in the photo).
3--Use Leaves Galore Template to cut the curves on the outside edge of each wedge set.
--Use the 4" side of the ruler.
--Use the right side of the wedge set. Line up the little "a" in the center of the inside curve (concave) of the ruler to the outside center seam of the wedge set. The "a" edge will barely sit on the edge of the fabric, or sit next to the fabric.
--On the two side edges of the wedge sets, line up the "c" on the outside of each side of the convex curve of the ruler (the outside of the 4" marking). The "c" marks will sit about 1/4" below the corners edges of the fabric. The marks will look like they're creating a cross-hatch across the corners.
--Hold the ruler firmly, and use a small 28 mm rotary cutter. Cut slowly, and carefully snug the cutter to the curves of the ruler.
This is what is left:
Repeat the cutting with all four wedge sets.
Appliqué the arms of the cross
1--On the background square, fold in half and quarters and lightly press to mark centers and quarters. Fold on the diagonals in half and lightly press to mark the diagonal quarters.
* Decide whether you want your Maltese Cross set straight or set on-point.
Straight set/square set:
 |
| Copywrite Rachell Reilly. Original Pattern: Maltese Cross Dresden |
On-point:
 |
| copywrite Rachell Reilly, original pattern: Maltese Cross Dresden. |
2--Apply fusible web to the backs of the wedges:
--Cut 4 fusible web pieces roughly just smaller than the wedge set pieces.
--Apply fusible web to wrong side of each wedge set with hot iron, following manufacturer's instructions. Allow to cool, then remove paper backing only right before the next step.
--Using the center seams on each wedge set and the pressed marks in the background square, line up and lay out the wedges on the background square. The corner sides of each wedge should just touch in the center, leaving a blank "circle" uncovered in the center of the square--see fingertips in the picture.
--When you are satisfied with placement, whether squared or on-point, pin wedges in place on background square, then fuse with hot iron.
--Appliqué the wedges. To anchor the wedges, I used a longer straight stitch in a matching color, scantly inside the wedges. Then I used a shiny, matching-color embroidery thread to satin-stitch around each edge and hiding the anchor-stitching. (I used Sulky)
Anchor-baste:
Satin-stitch:
Make the center circle.
This is where you will need the spray starch and the cardboard or Mylar 7 1/2" circle form. Basting-stitch on the marked 8" circle, then follow the tutorial:
Use the tutorial on perfect circles from Karen's Quilting.
http://karensquilting.com/blog/2009/12/making-circles-to-applique-tutorial
--Finally, embroider, if desired, the firefighter scramble (helmet, ax, ladder, pike pole, bugle) inside the circle. I used a light box or window to trace the scramble with a white washable pencil from a Maltese Cross graphic. I used white embroidery floss and hand-embroidered using an outline or stem-stitch. You can use an embroidery machine if desired or if you have one.
Applique the center circle :
1--Cut a circle of fusible web slightly smaller than your finished circle. Apply webbing to wrong side of circle. Let cool and remove paper, then center on Maltese Cross and fuse in place. Allow to cool, then satin-stitch around the edges with matching embroidery thread. I also used white or silver thread to satin-stitch a circle around the scramble. Then I quilted straight stitch in the ditch on each side around the satin-stitched circle.
*If desired, then embroider by machine or hand in the arms of the cross: the fire department name, the name of your firefighter, "Fire and Rescue", the hydrant and EMT symbols, or anything else you desire, seeing picture above. Or you can do the embroidery before appliquéing the cross wedges on the background.
Finish:
Trim background square to 18 1/2" square. Use in your quilt! I use it as a medallion center.
*When my quilt is sandwiched and ready to quilt, I use white quilting thread to stitch in the ditch around the center circle, then quilt along the traced/satin-stitched circle around the scramble. Use invisible thread to stitch-in-the-ditch around the edges of the rest of the cross. Use red matching thread to quilt in the ditch along each seamline in the wedge sets, and outline around the scramble elements. Then I used thread matching the background, or white, to radiate straight quilting lines from the center outward, starting from the outside edges of the wedge sets, extending from each seamline of each wedge. See following pictures.
You are Finished!
If you have any questions, please email me and I will be glad to help!
And I would adore hearing back from you and seeing pictures of your finished block and/or quilt !
Statistics:
18" finished
Fabric used: Robert Kaufman "Marbleous" in red. Grey background: Keepsake Calico by Joann Fabric in grey gravel
Thread: Sulky 40 wt rayon embroidery Color 943, Coats and Clark cotton white quilting, Gutermann red polyester and silver polyester for piecing.
*Sue's Leaves Galore Templates can be found on her website: www.suepellanddesigns.com
I purchased mine at www.anniescatalog.com
Amazon.com has them as well.
The EZ Dresden ruler can be found at Joann's fabric stores, and many other quilting websites.
Two great resources for a basic history of the firefighter Maltese Cross, and some sources for graphics and decals to help you with your embroidery:
http://www.nyc.gov/html/fdny/html/history/maltese_cross.shtml
http://www.firefightermaltesecross.com/