Wednesday, December 18, 2013

Swoon pillow quilting

Yay!

I've finished the quilting on the Swoon pillow. It was great practice, and good testing material for designs.
I have really enjoyed Angela Walter's Dot-to-Dot Quilting class on Craftsy. This is a great resource for anyone. She's a great teacher, and is really great with support, encouragement, and answering questions.


I guess it's a little difficult to tell from these pictures. The iPad always gets better pictures than my iPhone.
But the back is really great reference for the rest of the quilt.


Decisions:
1--Love the corner backgrounds, and background in the flying geese that make the center star points, as well as the background between the outer star points.

2-I plan on doing a different motif in the center of each star.

3--I think it's important for me to find paler thread to match the colors in the blocks. And use white in the white background prints.

4--ditch the curved outlines in the diamonds. It looks messy. I will stick with straight diamond shapes echoing the diamonds, like in the corner below.

5--Also, I will not do the curves in the background triangles around the center star and in the center-star points. I will do straight diamond halves to emphasize the triangles. Or do echoing straight triangles.

7--so happy I found the designs for the pentagon-shaped star points! Thanks to Angela Walters for pointing me to her blog posts about personally quilting Swoon quilts, where I found the inspiration for the pentagons. (They are combined variations of the Starburst and Lattice designs she teaches.)  I love it when the teacher has worked on the same block and quilt that you have!

http://www.quiltingismytherapy.com/?s=Swoon


Now I'm ready to make the pillow cover and buy a gigantic 24" pillow form. 

Anyone know a good tutorial for removable, washable throw pillow slipcovers?


Pillowcases

Hi !

By the time I finished my catch-up post last time, it was too long to include what I accomplished that night: pillowcases!

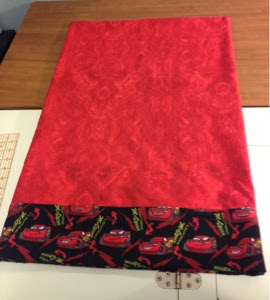
I took time out of FMQ  to make a pair of pillowcases for S. Since he loves red and Disney Cars, I purchased some flannel a while back with the purpose for pillowcases. It's only fair, since I made a pair of pillowcases with Thomas and Friends for J.

The funny thing about flannel is: it's not as wide as regular cotton fabric, and it shrinks notoriously! I always pre-wash and pre-shrink flannel, otherwise, the object I'm making will be too small.


And after pre shrinking, I discovered that I didn't have enough of each fabric to make identical pillowcases. So I improvised!
I'm particularly proud of the red flange that I inserted in the all-Cars print pillowcase. It helped with some contrast between the main body and the band. But wow, sewing was difficult through all the layers where the flange is. Wow.


I used the free "Roll It Up!" PDF tutorial from All People Quilt's 1 Million Pillowcase Challenge.
http://www.allpeoplequilt.com/millionpillowcases/freepatterns/

  There are no raw edges anywhere in the case with this method, as it shows you also how to sew French Seams. French Seams seem to have a bad rap as difficult and time-consuming, but the ultimate in couture sewing. I actually enjoy sewing them, and I love having no raw edges! The perfectionist in me doesn't like messy raw seams. I guess I got really good at them while making my wedding dress, with the slippery chiffon and satin charmeuse.


Look at those pretty, enclosed, narrow seams!


Now I just need to decide whether to gift these pillowcases to S. for Christmas or his birthday (which is right after Christmas).


Tuesday, December 17, 2013

More Swoon practice

Hi to all !
Christmas is getting closer, and so is my baby's due date! I'm 33 weeks along!

I've been trying to take it easy, stay off my feet, and do little things. 
1--I've been cutting some new stencils for quilting designs in the centers of the Swoon stars (mostly from Quiltmaker's "501 Quilting Motifs" book). I enjoy cutting my own stencils, but I have a single blade Fiskars craft knife, so a double-bladed stencil cutter from www.quiltingstencils.com is definitely on my wish list.

2--I've been tweaking color arrangement and printing cutting charts for the baby's quilt. I love my Quilt-Pro software for this step. It prints a color thumbprint of the block, plus a black-and-white chart next to it that is labeled by patch, then a breakdown of all the patches by color and cut, with how many of each patch and sizes.

Today, I made copies of foundations for the paper-pieced blocks.

3--I've been continuing my fun with Dot-to-Dot quilting all week. I'm getting better, and quicker. I've nearly got the practice block/pillow done. It's great for auditioning designs. Angela Walters is a great teacher, and gives positive encouragement and feedback to questions. I tend to ask a lot of questions!


I ordered the "Rainbow" cotton thread set from Connecting Threads, thinking it would have all the colors I need for this colorful quilt. There are some great colors in the set! The Red is what I've been using to piece the firefighter quilt and the Swoon blocks--it's perfect matching the backgrounds. I think the Orange will be perfect. The Lime green is the perfect color, but still too dark. Above, you can see the green thread stand out in all the star and diamond patches--ooh my stitches are wobbly! I've pointed to the green thread against the white background with dots.


Now I've used pure white in the pentagon shapes between a the diamonds, with the white-background-dots print, and that works much better! I need a paler green, and a pale blue for the pale blue patches. That's the problem with ordering off the Internet and a computer screen, not being able to match colors with your own eyes and fabric in hand.

My local stores don't carry a lot of high-quality machine quilting thread. For example, I live in the home state of Superior Threads, and no shops in my county carry their products!  We all know that we quilters are hands-on, touchy-feely people when it comes to fabric and colors!  I love working with the King Tut cotton line, and really want to try the So Fine polyester.

For goodnight:
Baby Update:

At my last two doctor's appointments, this baby has been measuring 2 and 3 weeks larger than gestational age. Hmmm, no wonder my back is hurting and I'm stiff and sore. My ankles are swollen huge, my poor hands and wrists ache and feel pins and needles constantly. I found some mild compression nylon stockings last weekend, and after wearing them for two 12-hour shifts at work, my ankles sure look better!
In my pictures, you can see I'm wearing my Dritz Creative Comfort compression gloves. I wear them a lot, and I even wear them under my Fons and Porter machine quilting gloves!

I have a feeling my 4-yr-old is not going to be sharing the baby blankets well, so I'll need a bunch of new ones. It's very cold right now...hitting 0 Fahrenheit at night and not reaching 30 during the day. The baby's room is the coolest room in the house because it's north-facing, so extra blankets and quilts are needed. Especially if my body decides it has had enough stress and this baby needs to be delivered prematurely, like both of his big brothers. I need lots of prayers and good wishes to get to 37 weeks and a healthy baby and body.

Monday, December 9, 2013

Swoon Dot-to-Dot

Oh my! I'm excited!

I've finished stabilizing the Swoon quilt!
That was a lot of work!

Then I basted the Swoon block for the pillow and stabilized it. One block is very fast and easy.


I've been taking Angela Walter's "Dot-To-Dot Quilting" class on Craftsy. It's a lot of fun. I'm very happy she's showing all her designs and techniques on a domestic machine, because that's what I'm working on. I'm a little scared to just take off and go, but using dots for guidelines is helpful to reduce my fears of ugliness and wonkiness.

I made a few copies of the quilt layout from the pattern, and I've been doing lots of sketching with that and plain paper. That helps develop muscle memory, and to get a feel of what designs I like and don't like with the quilt.


Tonight I warned up, studied all the screen shots I made from the class to remind myself how to do it, then I took off!

I'm pretty proud of how it turned out for my first attempt.


And now here's the back:


Sunday, December 8, 2013

December goals

Hi all!
I can't believe 2013 is coming to an end soon!

And my pregnancy is coming closer to an end, too.

Main Goal:
1--Finish the Swoon pillow.

Secondary Goals:

1--the one thing I might definitely get done is pillowcases for S. I've got some great Disney Cars flannel that he would love, that will go great with the quilt and pillow because of all the red!

2--Keep quilting the Swoon quilt. I don't know how far I'll get.


Its really hard to see, but I'm doing all the stitch-in-the-ditch. I've been working each night and a bit in the morning, all week. It's a big, heavy quilt under my 5-7" of machine arm space, and I spend more time adjusting and moving the quilt than actually stitching.

There's more I want and need to do, but I'm just not feeling well, and the numbness and tingling in my hands have spread to all fingers and thumbs of both hands. I can barely grasp anything and can barely feel what I pick up...I keep dropping lots of things.

3--I need to start printing cutting instructions for the blocks for the baby's quilt. And start cutting the block patches out. I just don't know if I can do it. 

Can anyone help me with the cutting?

(Fabric, and some cutting instructions in the file folder, patiently waiting.)

4--I sure would like to make a few cuddle wraps to swaddle my baby when he gets here. That might not happen.

Saturday, November 30, 2013

November Progress/Finish

Happy Thanksgiving and end of November ! I cooked my Thanksgiving meal today. With me working in the Emergency Room, and my husband and both his brothers working public safety jobs on Thanksgiving, we get together whenever we can for dinner. And I cook.

I'm exhausted, but I need to report my November finish with SewBittersweetDesigns.

I'm not sure I really had a completion for November.

I finished two quilt tops (Swoon and fire station quilt).

I finished the backing and layering and basting the Swoon quilt. I have started quilting it....starting with stabilization by stitching in the ditch. It's the biggest quilt I have nearly finished...ever! My hubby insisted that I use a double layer of batting. So this quilt is big and heavy, and with less than 7" of machine arm space on my little Bernina, it's extremely difficult to fit and maneuver, even with a lot of table space.


These are my attempts to scrunch and roll the big quilt. It take more time to keep adjusting and wiggling the quilt than it does to actually stitch the seam!

If you're wondering what those little blue blobs are on top of the quilt, those are my Fons and Porter machine quilting gloves. They are great!


Tuesday, November 26, 2013

Charms and basting

Hooray!
The mailbox yielded a yummy treat yesterday--the Kate Spain Charm Swap package came! Thanks so much to my friend Michele @ Quiltsfrommycrayonbox.blogspot.com for organizing the swap and organizing all those charm squares!


These are just a taste of all that fabric goodness from my favorite designer. I love how most of the colors and prints throughout all of the collections go so well together.

Sunday, after starting an antibiotic on Saturday, I still wasn't feeling well enough to attend church meetings. Hubby had just gotten home from his fire shift, so he relaxed with Star Wars on the computer while I organized some of my stash. We bought some drawers last week (along with plastic bins and storage ottomans for toys and storage items--all part of cleaning and getting ready for the new baby).
I should have taken a before and after, but after is definitely better!


There are some PIGs (Projects In Grocery Sacks), tote bags, and boxes.

And I wrestled mightily and layered the Swoon quilt sandwich. I got a start on pin-basting. This is the largest quilt I have done myself to date!


Here's a sneak peak at underneath!
I use clamps and painter's tape from the hardware store to stretch and put tension on the backing, then layer the batting and quilt top, matching centers.


Then I smooth it all out, working from centers outward as each layer is placed. Then I start pin-basting with curved safety pins and using my Quik Klip, working from the center and radiating outward in rows. When the section is finished, I carefully lift the top layers and unclamp the backing, carefully shift the whole sandwich for a new section on top of the table, then start clamping the backing to the table again.

I got a good start, but I couldn't work for long. With the tendinitis and pregnancy swelling, I can't grip the pins well, and can't feel them well with my fingertips tingly and numb.  I called my neighbor, who is a nurse, and firefighter's wife like me, and who also loves to sew and quilt like me, and hopefully she will be able to help me tomorrow.